My Aromatic French, Chocolate Ganache Macarons with a Fleur de Sel garnish....Yes, I made them in Paris!!!!
Bonjour! Several weeks ago, I returned from Paris and I am SO excited to share with you my culinary journey of learning the art of making authentic French macarons. Here is my personal memoir and recipe for you of how my journey began......
To some, I am known as the "Blue Ribbon Baker." I create, I cook, I bake, I compete and I can win a blue ribbon or two! My driving passion is in the love of the personal challenge of exploring, analyzing and creating a concept, that is aesthetically pleasing. For several years, I had hoped for an opportunity to hone these skills, by attending a class at Le Cordon Bleu in Paris. Le Cordon Bleu is considered to be the guardian of French culinary technique through its culinary programs that continue to preserve and pass on the mastery and appreciation of the culinary arts; which has been the cornerstone of French gastronomy for over 500 years! This was considered to be the "second home" for Julia Child, because she loved learning french cooking and baking and spent thousands of hours at this amazing institution.
I found culinary inspiration in EVERYTHING! Color is everywhere; even on a cloudy day. Just look at the colors of the locks on the bridge fencing. You can feel a blanket of love around you throughout the city. The photo you see of the two of us is on "lover's bridge" on Pont des Arts by Notre-Dame, in front of OUR lock!

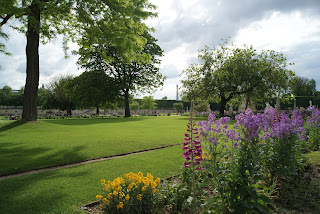
As I walked around Paris, I captured the most beautiful picture of the Jardin des Tuileries (that you are looking at) with my camera. This is one of the oldest and most beautiful public gardens in Paris. These gardens were the first in France to be made open to the public. As I walked along the myriad of colors and flowers and trees, the smell of lavender and lilac made my head swell of images of Spring and love and culinary fantasy. Le Jardin des Tuileries reminded me that I would be at Le Cordon Bleu the next morning and I began to think of what flavor and texture my macarons would be.
Would they be as tantalizing as a sweet rose cream or as delightful as a pistachio that had just been freshly opened? Would I create a french vanilla cream ganache or an exotic ginger spice? Would I create a spring time violet lavender macaron with a cream cheese filling?
I continued to find inspiration and creative energy, as I passed by numerous patisseries, where the star of the window display was........the macaron! Look below, at the long line just outside one of Paris' most popular macaron patisserie Pierre Hermé! Oh, and by the way, this was at 10:00 a.m. in the morning and we were the only Americans in line, next to the locals!!!
So, the next morning, I finally arrived at Le Cordon Bleu and look, where I, as a student there, along with the other local students, go to sit or relax before or after class. The indoor student "resting/social" lounge at Le Cordon Bleu, actually looks like a typical outdoor bistro. Tres Français!!
I was one of 14 students, and the only other American attending The Art of the French Macaron technique class! My excitement was so strong and vivid, that Chef Daniel even raised his energy level in teaching the class. He had so much fun posing for a photograph, as he demonstrated how to fill the pastry bag of meringue. I awaited further instruction from my French Master Patisserie Chef Instructor Daniel Walter.
 We even had a transalator, because "Chef," as he is referred to by his colleagues and students, speaks only one language....en Français! So, the process was to observe our Master Chef go through all of the steps first, and if we had a question or two, we would have to ask him via his transalator Marie.
  After Master Chef Daniel had shown us proper macaron piping technique, he explained to us about how critical it was to use the freshest almonds to grind into flour.
In baking or cooking, it is always advisable to have your ingredients and supplies ready, before you start working. True to form, our kitchen was prepped for us by long term Le Cordon Bleu students. All of the pots and ganache and flour ingredients were organized for us, so we could focus on technique and the ingredient mixture process. Don't forget....the instruction was entirely in French with some transalated English. I was very happy that I had 9 years of French under my belt, to get me through some of the instructions!
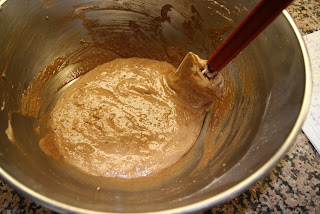
So, here is the process of our French macaron making.....All of our ingredients were of the highest quality right down to the Madagascar vanilla bean! Steps 1-3 are to grind the almonds, confectioner's sugar and cocoa in a food processor. Then to place the egg whites in a large bowl and whip them until consistent soft peaks are formed. Gradually, the superfine sugar needs to be beat in, to make a firm, glossy meringue. Using a spatula, you will fold the almond mixture into the meringue 1/3 at a time. When all of the dry ingredients are thoroughly incorporated, continue to cut and fold the mixture until it forms a shiny batter with a thick, ribbonlike consistency.
Step One
Step Two
Step Three
Chef Daniel said, that even after 40 years of professional baking experience and having owned several Michelin rated restaurants, that his "heart flutters with anxiety," each time that he prepares to make macarons. He continued, by saying that "macarons are tempermental and each batter is unique." Needless to say, this increased my anxiety of over-whipping my meringue. I had to start over and create a new batch of meringue. As you can see, the second meringue batter is a bit thicker in consistency, which makes forming the meringue circles more stable.
Step Four: Prepare your pastry bag and to insert the decorating tip inside before the bag you cut off the tip. Afterwards, with your thumb, push some of the bag up into the pastry tip, so that it allows space to form between the batter and the tip when inverting the bag. A "merveilleux" technique!! Prepare your parchment lined baking sheets, while your meringue is resting. As a matter-of-fact, many traditional macaron purists, believe that at this stage, one should be allowing the meringue to rest for 1-2 days to achieve the best foot and texture to the cookie.
Step Five: Pour the batter into a pastry bag fitted with a 1/2 inch plain tip. Pipe 32 small circles onto the prepared baking sheets. Tap the baking sheets firmly onto a work surface to remove any air bubbles. Add any desired garnish at this point (I chose fleur de sel) on half of the cookies. I was anticipating the fabulous contradiction of sweet and savory at the same time, when biting into one of them. Next, it is important to let the cookies stand at room temperature for at least 30 minutes. In the following photo, I am second to the left, carefully planning out the size, shape and proximity of each meringue circle to each other. Even with having to start over with a second batter, to strive for perfection, I was just about two rows of parchment application from my Le cordon Bleu peers. Phew!

I was exhausted knowing that we had no recipes or instructions to follow in class for our training, but had only to rely on our MEMORY or personal notes of instruction from the Chef, to create our macarons. It was macaron boot camp! Step Six: Now it was time to pre-heat the oven to 325 degrees F and then prepare our chocolate ganache filling.
Step Seven: To make the filling, we whipped up one room temperature egg in a stainless steel mixing bowl and then placed the chocolate in a heatproof bowl. We heated the cream in a saucepan until just boiling, then we poured the hot cream over the chocolate and gently sprinkled the sugar on top, before mixing. Then, we added the egg mixture and stirred until the mixture until well incorporated, letting the cream mixture cool for about 20 minutes is important; so as to not cook the eggs and to allow it to thicken. We scraped the vanilla beans on top of the cooled mixture and gently folded everything together to create a lustrious and glossy ganache filling.

At this point, it was time to bake the cookies in the oven for about 15 minutes of baking. When I went to check the results, I was thrilled that it was time to take the macarons out of the oven. The meringue batter produced exactly 32 cookies!
Step Eight: I piped the ganache on top of half of the macaron circles and sandwiched pairs of macarons together, before waiting for my Chef's approval of my finished cookie.
 My goal was to create uniform circles. Although, some were not perfect, I still just wanted to wallow in their splendor. The decadent chocolate ganache was delicately balanced on the buttery sable chocolate crust. Despite their flaws, I did find perfection at their immediate slight crunch at impact, then turning chewy and revealing intensly flavored deep chocolate flavored cream on the inside of the macaron cookie. After carefully stacking my macarons and receiving approval from Master Chef Daniel Walter, I was able to earn my certification of The Art of the French Macaron technique!
When I returned back to our Paris apartment, my mind, body and creativity were in full force. I knew what I had to do........I had to get my camera out again and finish the macaron adventure. I took several of my macarons, placed them in a french themed container and shot them (without flash) on my living room window ledge. Voilà!!
This blog entry is my personal memoir and the recipe for you, which follows, is of how my journey and love of the macaron has continued......just writing about them brings me back to that amazing aroma of deeply intense dark chocolate and double chocolate ganache. Both the beautiful texture of the glass cookie shell and the decadent filling were created from beginning to end, like a small, simple piece of art. For you see, the art of making macarons is complex. The cookie shell should appear glossy and smooth like glass and this is a difficult task when working with almond flour. Au revoir Paris! Like an Audrey Hepburn movie, I can now take out my umbrella and twirl it in the rain, out of pure joy and excitement that my macaron journey has really only begun......now it's your turn......follow the recipe below to create your little masterpieces!
Ingredients (for macaron):
3/4 ground almonds (milled fine powder consistency)
scant 1 cup of confectioners' sugar
2 tbsp unsweetened dutch processed cocoa
2 extra large egg whites
1/4 cup superfine sugar
Ganache filling:
1 large egg
3 1/2 oz bittersweet gourmet chocolate, finely chopped
2/3 cup heavy cream
1 Madagascar vanila bean, split and contents scraped
1/4 cup superfine sugar
Step 4: Prepare your pastry bag and insert the decorating tip inside the bag before you cut off the tip. Afterwards, with your thumb, push some of the bag up into the pastry tip, so that it allows space to form between the batter and the tip when inverting the bag.
Step 5: Pour the batter into a pastry bag fitted with a 1/2 inch plain tip. Pipe 32 small circles onto the prepared baking sheets. Tap the baking sheets firmly onto a work surface to remove any air bubbles. Add any desired garnish at this point (I chose fleur de sel) on half of the cookies.
Step 6: Pre-heat the oven to 325 degrees F, then prepare the chocolate ganache filling.
Steps 7-8: Follow steps 7-8 as mentioned in the aforementioned journey.
Enjoy all of your efforts. Soon you too will be saying "Je prendai un macaron, s'il vous plait."


No comments:
Post a Comment